Lower Guk
Antonica (back)
The Ruins of Ancient Guk is a vast array of tunnels that connect between the ruins themselves and the upper tunnelways that eventually lead to the Innothule Swamp. It is also the battleground between the living frogloks, led by the Froglok King, and the undead who have taken over most of the deepest ruins, led by their Ghoul Lord.
Lower Guk is one of the two primary dungeons for high level characters (35-50). While there are other hunting areas open now, lower guk continues to be one of the most crowded dungeons at primetime. One of the major reasons for this is that the loot here is very good, with many of the "best of class" items available here. Lower Guk can give very good experience, especially at the off hours, but during primetime, finding good uncamped hunting areas can become very difficult.
Lower Guk is accessible from Upper Guk in 4 areas, however, 3 of the 4 entrances lead to near the same spot, called the "dead side entrance". The entrance from upper guk that is further away from the rest leads to the "live side entrance". Guk is typically divided into two sections, live side and dead side. The live side contains live frogloks, while the dead side contains froglok ghouls. These two factions are supposedly warring, although they won't attack each other or anything like that.
The live side is less camped than the dead side, because many people don't want to hurt their froglok faction. Live side also has a lot more wanderers, so it can be considered more dangerous, and I'm sure many many people get lost in the maze on the live side. The monsters here range from the Shin Knights at minimum level 27, to the Froglok King and Guk knights, who reach level 49.
You must be at least level 5 to zone into Lower Guk.
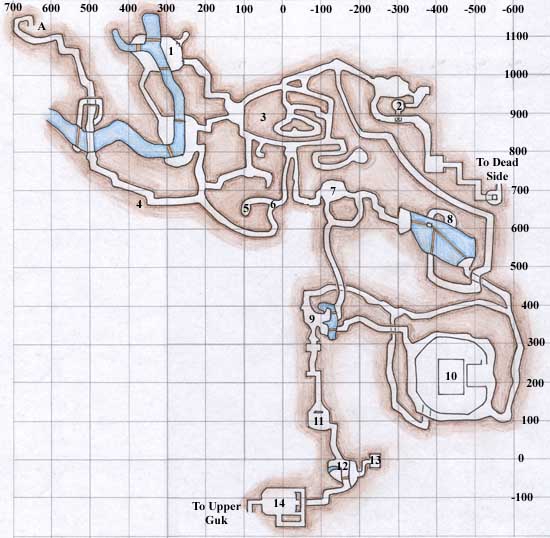
Map of Live Side
|
Live Side
Letter A marks the zone to Upper Guk |
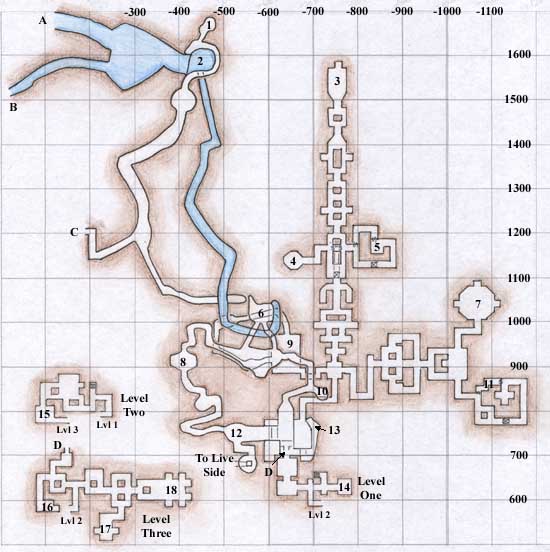
Map of Dead Side
|
Dead Side
A, B, and C are all connections to Upper Guk D is underground tunnel to D on Level Three |
Dangers
This dungeon is generally regarded as one of the two most deadly dungeons on the continent of Antonica. It is divided up into two general areas, the "Live" side and the "Dead" side, named for the life/unlife status of the majority of the frogloks within. There are general dangers for the dungeon, as well as for each side, that I will mention before going into specific dangers.
Lower Guk has as its main defense the confusing nature of how it is set up, as well as lack of ready access to the deeper areas of the dungeon. It is quite easy to get lost if you don't know where you're going in these tunnels, and this is especially noticeable in the maze area on Live side. Also, getting to a particular point in the dungeon from which to pull is not an easy task for most, because they are deep in and past many aggressive creatures. The use of invisibility is helpful, but only with large cautions to it. First of all, the distinction between Live and Dead side is not absolute. On Dead side there are many "live" creatures that can readily see through Invis v Undead, most noticeably the vampire bats. On Live side, it is possible to encounter undead creatures because of infrequent trains to the exit, although this is much less likely. Also, there are occasionally creatures that can see through invisibility as you travel through, so be careful as you go. Now onto each individual side.
Live side is a typical dungeon that you are likely used to, in the vein of the Solusek dungeons. The only specific danger to this side is that hunting here can seriously hurt your froglok faction, which for many is important in order to safely travel Upper Guk as well as most of Live side. If you are unfortunate enough to lose faction when you didn't want to, killing undead frogloks will increase your faction with the living ones. Dead side's only real danger is the number of undead monsters. This is a big bonus for those classes with special skills in this area, but for the others brings with it the fun that fighting the undead always brings. Most of Dead side is also very far away from any exits, so you had better have an evacuator in case of trouble.
There are few specific dangers to note in Lower Guk. The few that exist are that there are quite a number of shaman and wizard frogloks in this dungeon, which can be very problematic because of the DoT and DD spells. Most groups tend to remove them from battle sooner rather than later. The Huge Water Elemental is important to note on Live side, because even if frogloks are your friends, he will attack you and the nearby frogloks will assist him. He can see through invisibility.
Benefits
There must be something that keeps bringing people to Lower Guk, because it traditionally has been one of the most packed dungeons around, and you were able, in the past, to walk nearly freely as the frogloks were dead within seconds of appearing in their homes. Things have gotten a little bit less crowded in there, but the draw is the same: experience and loot for high-level characters.
The items in this zone are probably the most sought after items in the game for this level range. Skimming through the listing reveals mainstays of high-priced auctions, like Short Sword of Ykesha, FBSS, Runed Falchions, to name a few. Most people come here to hunt with the dream of ancient froglok treasures to carry them into the swamps.
This is also a great area for experience for higher level characters. It is also something of a training ground for fighting in the higher level dungeons on Kunark, as the skills that you develop here for advanced grouping are absolutely essential when you move to the even more dangerous dungeons of that once-lost continent.
Alternate Maps and Zone Guide (Quester of Norrath)
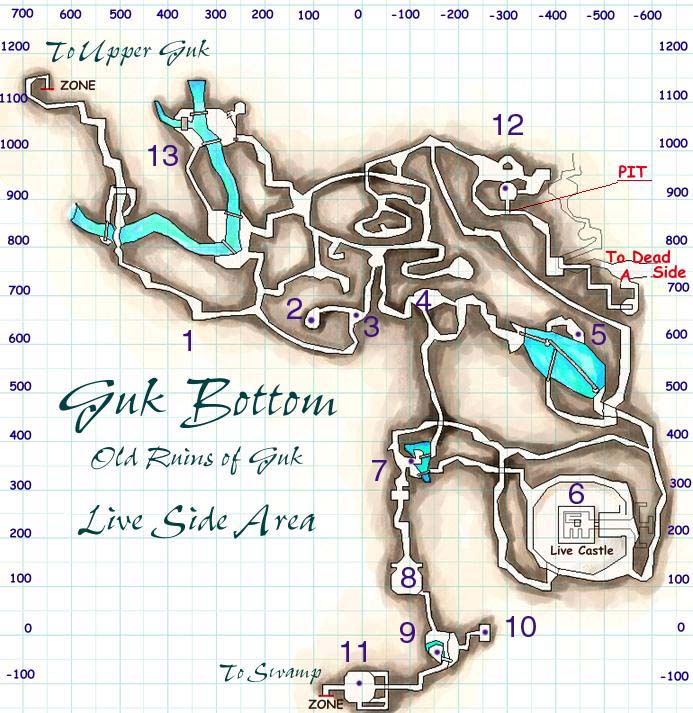
- 1. Live Side Entrance Area - This area from the zone to this point is the entrance area of the live side. Lots of people set up in this area and pull to here. This is a pretty nice place to set up, except that you're in the path of any live side trains. It's probably best to pull from the maze to here for awhile until the way is clear and you can set up camp elsewhere. This area is mostly Shin Knights, and an occasional Tsu shaman. There is a little know secret wall right before the bridge on the left side that leads to the upper area. Nothing of interest here though. Falling off the bridge on the left side is a nice shortcut to the Shin Knight Water Room (13). Past the (1) marker is the live side maze, which occupies the majority of the live side. Be careful here, it's easy to get lost in this maze, and it's a lot deadlier than that Cazic Thule maze. The easiest way to get through the maze is to hug the right wall all the way to the jail room (4) and then cut straight through. This will take you to the evil eye room (5), from where it is easy to get to any of the other major named spawns.
- 2. Three Minotaur Room - 3 Minotaurs spawn in this room. If you are camping the patriarch, this is a good place to do it from, otherwise you might lose the patriarch to passer-bys. There's also a special froglok spawn named Slaythe the Slayer
- 3. Patriarch Spawn - This is where the minotaur patriarch spawns. He's around level 35 and a ranger mob.
- 4. Jail Room - One of the few rooms in the maze which is easy to distinguish from others, this room has 3 jail cells in it. It also spawns 3 Wan/Urd monsters. It's mostly used as a landmark.
- 5. Evil Eye - The evil eye is a level 35 wizard mob that can see invis. He spawns about 80% of the time, and drops the Bag of Sewn Evil Eye (common), and used to drop the Manastone (rare). This room is useful as a camping spot (not at the eye itself, but at the shore between the jail room and the eye. It's also easy to get to the different areas of live side from here. Facing out from the evil eye cubby hole, left will lead you to the live side keep (6), right will lead to to the jail room (4) or the noble room (7), and straight will take you to the elder room (12) or dead side.
- 6. Live Keep - Sometimes called the castle, or the live tower. The keep spawns the Yun Priest and the Crusader. The keep has 3 levels. The roof and entry bridge are usually Vis and Wans, the second floor is Zols and Yuns, and the bottom floor is Zols and Dars, and rarely a Bok. You need a good 38ish group to do the priest properly, and a good 42ish group to do the crusader. The priest spawns in a room on the second floor, and the crusader spawns in the middle spot at the end of the third floor. Both are uncommon spawns. Priest is a 39ish cleric and the crusader is a 42ish paladin.
- 7. Noble Room - This room is where the froglok noble spawns (37ish enchanter). It's also the entrance to the super hard area of the live side. There is a gateway here. If you go through it, it will lead you towards the king.
- 8. Huge Elemental Room - The huge elemental is a really annoying super aggro see-invis mob. And while his name says he's huge, he's actually smaller than a standard elemental. Even though my froglok faction was dubious, he attacked me, and the zols in the room assisted him. He's about level 40, and he looks like a water elemental. He drops nothing. I believe he's mostly here as a deterrent to explorers.
- 9. King Prep Room - This room usually has a few Boks and Kors, as well as a high level Granite Gargoyle, and is a great place to pull the king to if you're trying to break the spawn. There is also a wanderer that goes from here to the king room, and Dars aren't uncommon.
- 10. Herbalist Room - This is where the Froglok Herbalist spawns, along with one other Dar level mob. He is a shaman mob.
- 11. Froglok King Room - The bad-assesed monster in Lower Guk, the King is a level 47 paladin, has at four guards, including boks and kors. He's got a ton of hit points, plus a lay hands. Behind him is a zone to upper guk, which takes you to the Innothule entrance of Upper Guk. It makes a very good escape from bad pulls or a king fight gone horribly wrong. It's faster than evacing, since the tanks don't have to run from South Ro. Occasionally, one of the guards spawns the Froglok Tactician, a high level wizard
- 12. Elder Room - This room spawns the Minotaur Elder. Be careful, as there is a pit-trap leading into the pit in this room which can kill you if you aren't careful. The elder himself spawns inside the pit, and is a pretty common spawn. He drops the Chrysoberyl Talisman (common) and the Carved Ivory Mask (rare). This is another good area to set up camp. From this room, you can get to the dead side of lower guk pretty easily, and I've actually pulled dead frogs and other stuff from the dead side when camping here. A small tower leads from live side to dead side. Raster of Guk, an extremely rare spawn monk who drops the Idol spawns here as well, in the upper alcove in the room next to the cauldron. The pit is a pretty safe area. If you fall down the trap, you can fight _just_ the elder spawn with nothing else joining. He may suicide when trying to flee though.
- 13. Shin Knight Room - This area of lower guk has about 8 or so Shin Knights that spawn here, and it's a pretty good place to pull the maze to. There's also a corridor between the two rooms which no patrollers go through. A small group can make use of this corridor as a safe pulling zone.
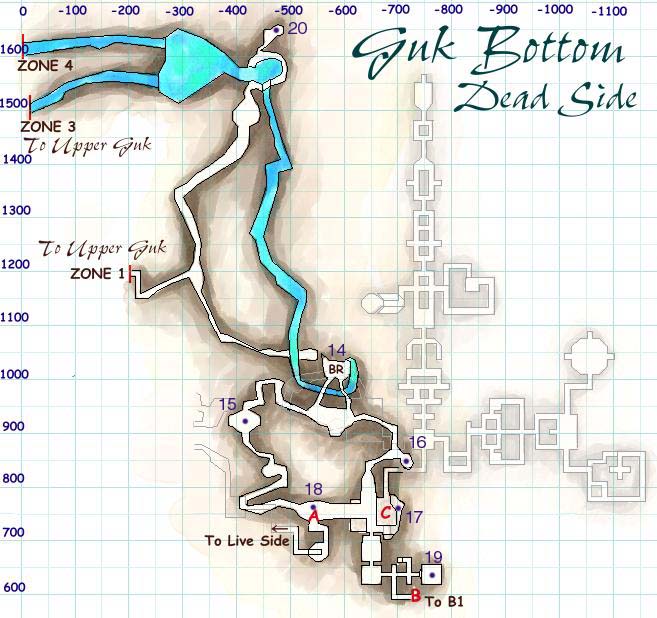
- 14. Bedroom - Aka "BR", this is one of the biggest landmarks in the zone. It's mostly considered the entryway into dead side lower guk, and a lot of time there will be a group in that room, killing the frogs, spiders, bats, and gargoyles that are easily pullable. Many expeditions to lower guk begin at the bedroom, where the group will get together, buff and invis up, and then head to their destination.
- 15. Spider Room - Another common location to camp for bedroom hunters. It's out of train paths, and you can pull bats, spiders and gargoyles with ease.
- 16. Greater Ice Bone Skeleton Room - Also called GIBs or Gibs or GIB Room. 4 Greater Ice Bone Skeletons spawn here. Around 32-33ish.
- 17. Ritualist Spawn - This entire area is known as the bridge. Crossing the bridge leads to the tower, and falling off the bridge to the left is a quick way to the bottom floor of Lower Guk dead side. The marked spawn is the Ritualist. Normally 3 tal wizards spawn here. Sometimes a ritualist spawns instead, who is a necromancer, around 32. If you turn right at the bridge, you can go down to live side of lower guk.
- 18. Gargoyle Spawns - Three gargoyles spawn here.
- 19. Store Room - aka SR. The first of the profitable dead side camps. This room is off to the side and up a ladder. Usually 3 wan levels spawn in here. There are also 2 rare spawns here - Ghoul Assassin and Ghoul Supplier.
- 20. Waterfall Room - There are no spawns anywhere near this. This is where the Scepter of Sorrows is.
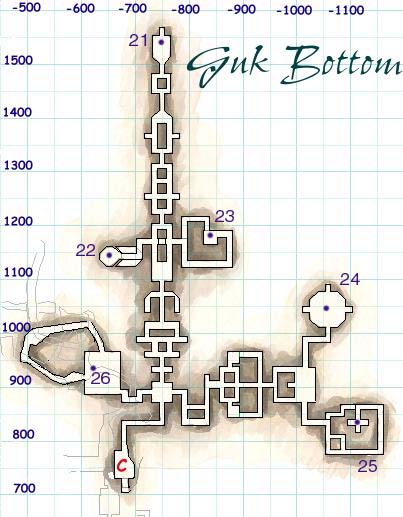
- 21. Ghoul Lord - This is where the lord of the dead frogs resides, the Ghoul Lord. He spawns with some nasty Bok and Guk guards, and is a level 47ish Shadowknight. Toughest fight in dead side.
- 22. Hand Room - The Reanimated Hand spawns here, above the water in this room. The hand is a level 39ish wizard, and spawns with a dar or zol guard. The hand spawns 100%.
- 23. Archmagi Room - The Archmagi is a rare spawn, and is guarded by 2 dars. He's a tough ass wizard (44ish?), with alot of hit points and high magic resist.
- 24. Frenzied Ghoul Room - There are 3 spots in this room, each of which can rarely be a frenzied ghoul. Frenzied ghouls hit very hard, especially when they have a flowing black silk sash. Alternately, these spots can be bloodthirsty ghouls, or dars.
- 25. Sentinel Spawn - Note that the area marked on the map is a triple spawn, but the sentinel is not one of them. The sentinel spawns alone in the secret passage room to the west of this marked spot.
- 26. Slave Room - This room has a zol and a dar in it.
Just above the "C" on the bottom floor map, there is a sharp L turn. This spot is one of the few areas that no wanderers come to. It's a safe area, and some people even bind here. After dropping off the bridge at C, most people regroup here.
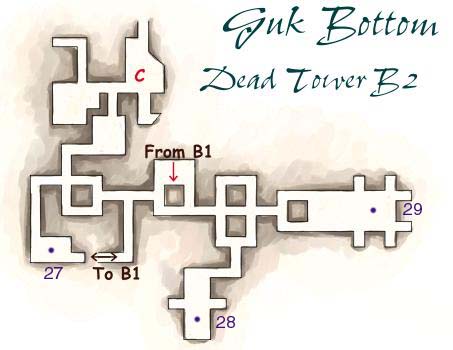
- 27. Cavalier Room - The Cavalier spawns here. He's around a level 37 shadowknight, and uncommon.
- 28. Sage Room - The sage spawns in this room. Watch out, he will be assisted by the spawns behind the secret wall here. He is pretty rare. He's a 37ish wizard. This room is kinda tough because of the amount of wizards that spawn here. The scribe also spawns here.
- 29. Executioner Room - The froglok executioner spawns on the platform in the middle of this room (which is easy to recognize because of the cages in the room trapping froglok slaves). He's a 37ish warrior.
- 30. Savant Room - The gateway to most of the spawns in the tower. If you are gonna camp the whole tower, this is the place to pull to. The scribe spawns somewhere around here.
Monsters
Zone Respawn Time = 28 minutes
Much like Upper Guk, frogloks come in different varieties. In Lower Guk, there are no warriors.. only knights, shaman and wizards. The live side has knights and shaman, the dead side has knights and wizards. The dead side creatures can also ghoulroot like any other ghoul.
- Shamans are shaman types of mobs. They are much more annoying in Lower Guk than in Upper Guk, mostly due to the pets that they have, as well as some of the nastier DoTs (Scourge, Venom of the Snake). They are usually the first targets, followed by knights, and then the pets.
- Wizards are much more annoying than shamans. They are only on the dead side. They nuke hard and have few hitpoints. Always kill the wizards first.
- Knights are basically standard warrior type mobs.
- A froglok's level is determined by its clan name. For each melee-style froglok, there is a caster counterpart of similar difficulty. The order of these is clan names (from highest to lowest level) is: Guk > Bok/Jin > Dar/Kor > Zol/Yun > Wan/Urd > Vis/Tal > Shin/Tsu
| Mob Name | Level | Type |
|---|---|---|
| a basalt gargoyle | 30 - 34 | Monster |
| a basilisk | 29 - 29 | Monster |
| a bloodthirsty ghoul (Lower Guk) | 38 - 42 | Undead |
| a bok ghoul knight | 44 - 49 | Undead |
| A Clay Gargoyle | 30 - 34 | Monster |
| A Corrupted Gnome Explorer | 45 - 45 | Monster |
| a dar ghoul knight | 39 - 43 | Undead |
| a deadly black widow | 30 - 32 | Monster |
| a frenzied ghoul | 42 - 44 | Undead |
| A Froglok Bok Knight | 42 - 46 | Undead |
| a froglok crusader | 42 - 42 | Monster |
| A Froglok Dar Knight | 39 - 43 | Monster |
| a froglok guk knight | 49 - 49 | Monster |
| A Froglok Guk Shaman | 49 - 49 | Monster |
| a froglok herbalist | 45 - 45 | Monster |
| A Froglok Herbalist Pet | 28 - 29 | Summoned |
| A Froglok Jin Shaman | 42 - 46 | Monster |
| A Froglok Jin Shaman Pet | 27 - 27 | Summoned |
| a froglok kor shaman | 39 - 42 | Monster |
| A Froglok Kor Shaman Pet | 26 - 29 | Summoned |
| A Froglok Noble | 40 - 40 | Monster |
| a froglok shin knight | 27 - 31 | Undead |
| a froglok shin warrior | 25 - 25 | Undead |
| A Froglok Slave | 2 - 4 | Monster |
| a froglok tactician | 45 - 45 | Monster |
| A Froglok Tal Shaman | 30 - 34 | Monster |
| A Froglok Tal Shaman Pet | 22 - 22 | Summoned |
| a froglok tsu shaman | 29 - 31 | Monster |
| A Froglok Urd Shaman | 33 - 36 | Monster |
| A Froglok Urd Shaman Pet | 23 - 26 | Summoned |
Traveling To, From and Inside Lower Guk
There are several entrances to Lower Guk from Upper Guk. Specifically, there are three entrances that come out in relative proximity in Dead side from Upper Guk. Two of these require a short swim through the rivers, and the dry one is closest to the front entrance of Guk. The one entrance to Live side is the deepest into Upper Guk, and isn't as commonly used.
Other than using the entrances from Upper Guk to leave, there is one additional exit. From the King's Room on Live side there is a zone exit in the back that will take you to Upper Guk right beside the entrance to the swamp. It isn't an exit for casual use, as it leads you directly past the toughest monster in Lower Guk, but it's there if you need it.
